Larval Diet
Optional : autoclave several batches of wheat bran in large 2L Pyrex beakers/dishes (20’, gravity/solid cycle), let cool, transfer to Size 11" x 16" Vacuum Sealer Bags, vacuum seal, and store at 4-6°C. This procedure will help prevent molding if this becomes a problem.
Recipe:
Recipe:
- Mix well the first three dry ingredients in a mixing bowl. Incomplete mixing will lead to clumping of dextrose and glycerol.
- Measure 30 g of canola oil on a large weighing boat/cup and swirl to coat the weighing boat before pouring the oil into the mixing bowl.
- Measure glycerol and water using the same boat/cup and pour into the mixing bowl. The oiled boat will let glycerol and oil slide off together into the bowl.
- Mix well until there are no clumps and no dry ingredients left.
Larval rearing containers
The stock container needs to be airtight to prevent egg dispersal and larval escape while still allowing air exchange and maintaining ambient humidity inside. It must also be able to support the growing (egg and larval) and reproductive (adult) stages. Ventilation is provided by drilling a 1-2 cm diameter hole in the lid of the airtight container and covering it with a copper mesh. To do this, a soldering iron is used to melt the plastic lid to make complete contact with the mesh. To facilitate cleaning, it is important that the mesh is soldered on the inner side of the lid, and that the melting provides a smooth embedding of the mesh into the plastic (do not leave grooves or crevices where larvae could lodge themselves). Also avoid prolonged bleaching of the lids as this will corrode this material.
Oviposition Jar
Oviposition jar is used for passing stock into a new diet. Plodia eggs are about 0.3 to 0.5 mm. Since they tend to adhere to the plastic wall due to electrostatic effects, a glass mason jar is preferred. The steel mesh is large enough to allow eggs to be collected by inverting and tapping while still retaining the adults and residual food inside the jar.
Culture Condition
Since Plodia is a common agricultural and household pest, containment and careful handling are important to prevent escape and settlement in the lab (e.g. Plodia can ruin honeybee cultures, or settle in drawers containing snacks). The main culture vessels are a stock container and an oviposition jar. Below, we illustrate simple modification to ensure containment while still allowing ventilation and egg collection, respectively.
Egg collection and inoculation of new stock
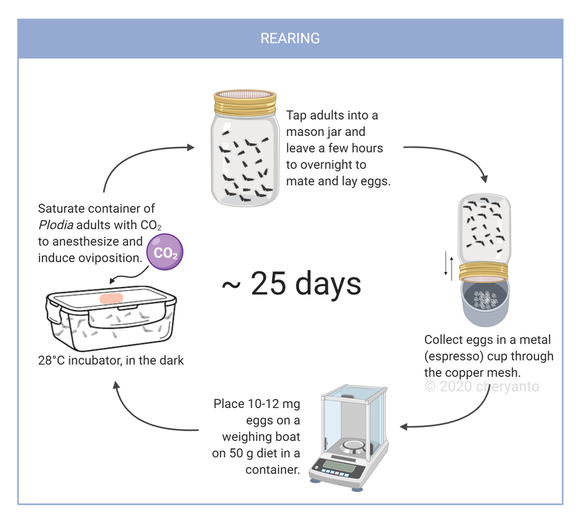
Identify a culture full with mated adults, i.e. ~3 days after moths have started to emerge (assuming the stock is well synchronized). Ideally, small eggs should be visible inside the lid, indicating the females are ready to lay. Obtain 10-12 mg of Plodia eggs using the synchronized Oviposition method (Fig. 1B-G):
- Prepare a clean mason jar with a mesh lid as an oviposition jar, stock containers with adults, ethanol, and a tray as a work surface. Make sure the inside of the mason jar is completely dry. Eggs may adhere to damp spots inside the jar.
- Anesthetize Plodia adults using CO2 gas through the modified container.
- Tap down the moths to one side lightly as not to disturb the food bedding.
- Open the container and transfer moths (min. 30 moths) into the Mason jar. Work quickly so you cap the mason jar and container as they will wake up in about 20 seconds. Re-anesthesize if needed, but do not try to get all the moths in, as this will tend to transfer sticky diet into the jar (better to avoid this). This procedure requires a little bit of experience, and self-confidence builds over time.
- Clean the surface of the tray well, ensuring no eggs were dropped. Devitellize the larval containers at -20-30°C for at least 72h.
- Leave the moths in the oviposition jar in the dark at 28°C for 4 hours (to overnight) to mate and lay eggs. Save the adults in the stock container as backup. Adults should not be left inside more than three days since the mesh is larger than the copper mesh used in the stock container. Earlier eggs might hatch as larvae and escape the steel mesh.
- Once enough eggs are laid on the bottom of the mason jar, collect them by tapping the mason jar upside down into a metal cup (to prevent static) through the mesh lid.
Plodia eggs disperse easily by sudden air change in airflow (through breathing or moving them too fast) and electrostatic effects (dry plastic, nitrile gloves). They are still used during handling but make sure to kill any residue especially on the gloves, the bench, and the weighing scale if the eggs do disperse.
Recommended: discard the eggs that are laid in the first 15’, as they will include pre-fertilized eggs that will desynchronize the batch. This is somewhat helpful for injection experiments, but not absolutely needed for basic stock maintenance. - Prepare 45-50 g of Plodia diet in a modified container (copper mesh soldered to the lid for ventilation). Pack it down to the bottom of the container with a gloved fist (step 4 in Fig. 3), as much as you can, since compaction will help to leave the diet intact when you collect the adult moths.
- Place the weighing boat with 10-12 mg of synchronized eggs on top of the packed food. Cover the copper mesh of the stock container with filter paper and tape around it for label. Information on the label: Pi_(strain) [date passed] [10-12 mg eggs]/[45-50 g diet].
- Leave at 28°C until they hatch and become larvae (see Life Cycle section). Check every 3-4 days for any signs of infection (yeast), food depletion (overly wandering larvae), or overproduction of silk. Larvae may loom silk from around the cover mesh and lid. If larvae are stressed, a thick mat of silk may even cover the entire culture, which can be removed in order to facilitate the upcoming transfer of adults to oviposition jars. At around 25-28 days, adults should have emerged. Leave freshly emerged adults 2-3 days to mate then start the synchronized oviposition.
- Optional: Pupal isolation can be done around 15 days after egg laying. Place some cut cardboard for the larvae to pupate in ("hotels"). Separate them as individuals manually (e.g. for sexing) or as hotels into another container (e.g. to rescue from mold growth)
Cleaning and disposal
Routine freezing at -20-30°C for a minimum of 72h is efficient to kill all stages of Plodia. To clean containers, simply rinse in a larger bleach container then use soap and brush to scrape any silk, food, and eggs residue away. Dry completely prior to next usage. Contact the biological safety officers in your institution and ensure compliance of your protocol with the local regulation for disposal. Refer to the Lab Safety section for more information.
Stock contaminated with mold?
The most common stock contamination problem comes from mold, which can stem from overcrowding, leading to food depletion and the release of water by the larvae. This will in turn raise the humidity inside the container and harbor mold. If you notice the food has completely run out in the container, you can add extra food, but the best preventive step is to ensure you are always providing 10-12 mg of eggs for 45-50 g of food in the containers (verify your balance calibration, and use a precision balance for eggs).
If mold appears while there is plenty of food in the container, you might need to take environmental control measures:
- autoclave the wheat bran and store in vacuum-sealed bags before preparing the diet (see above).
- ensure the bran is not expired, and that you use reasonably decontaminated ingredients (eg. autoclaved water).
- ensure your incubator fan is ventilating properly.
- consider cleaning your incubator, bleach containers more aggressively (but avoid bleaching copper mesh parts), and/or filtering the lab air with HEPA air purifiers.